How to Add Signature in Outlook: Complete Setup Guide for 2026
Professional email communication in corporate environments demands consistency, yet many users struggle with one fundamental element: email footers. The challenge isn’t lack of effort—it’s navigating multiple platform versions. Desktop application, web interface, Microsoft 365, mobile app—each requires different configuration steps, and many professionals give up after encountering the wrong menu.
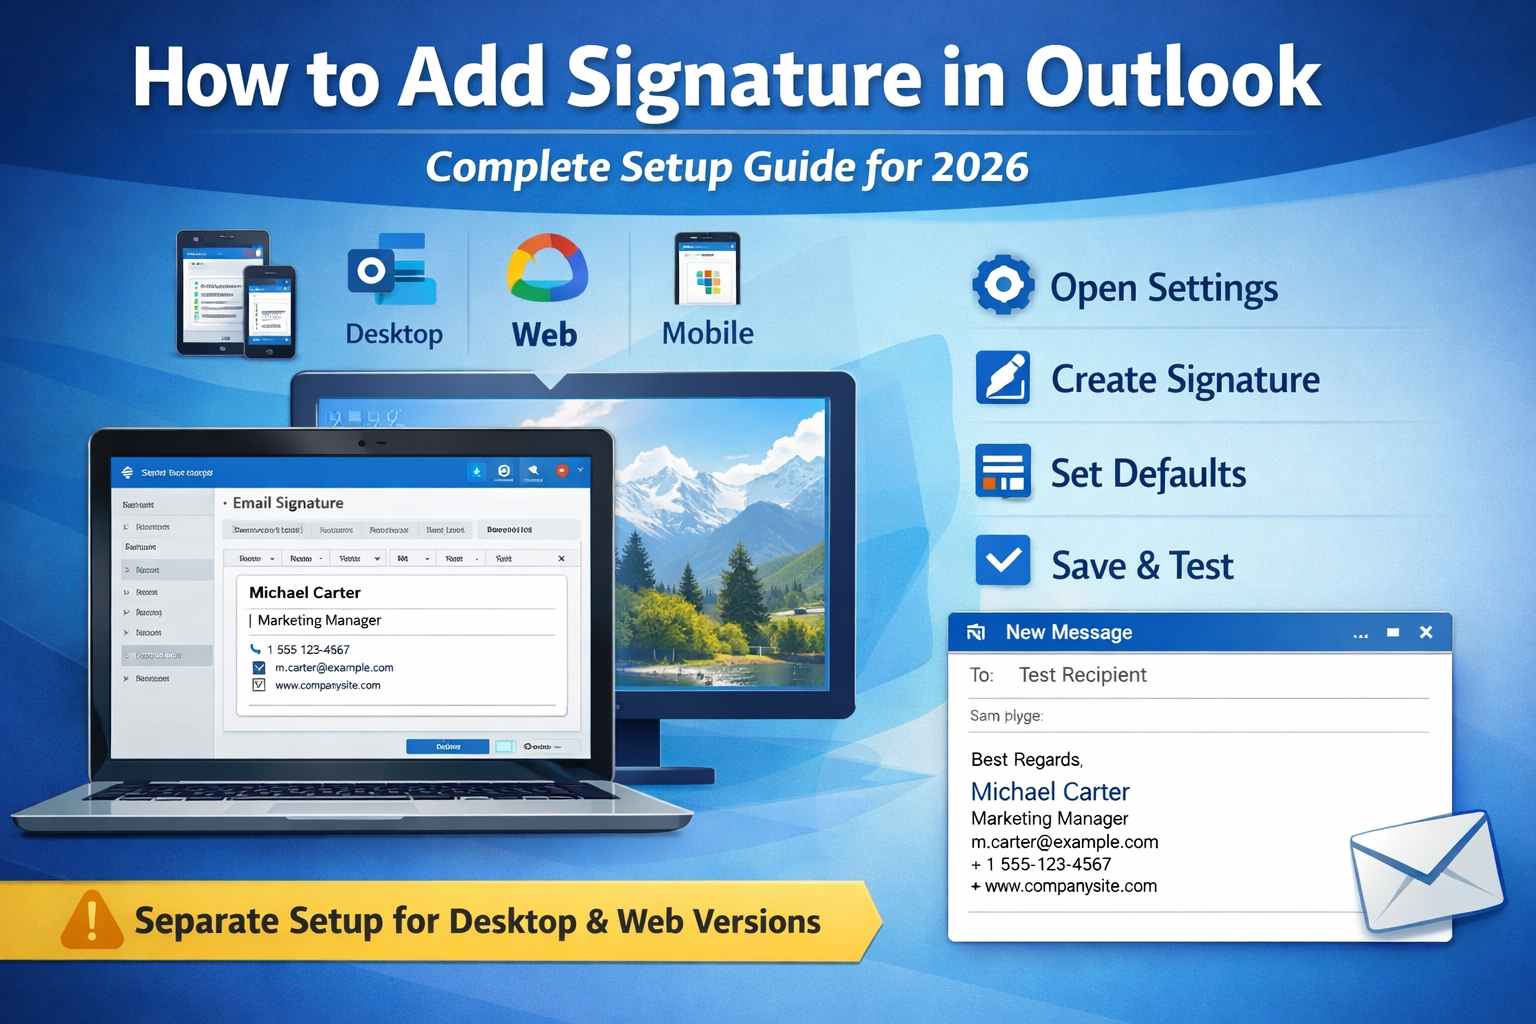
Configuring your outlook email signature requires approximately five to ten minutes depending on which version you’re using. This tutorial walks through setup procedures for all major variants, shows exactly where each setting lives, and highlights the version-specific quirks that typically derail first attempts.
Haven’t built your email footer yet? Our comprehensive guide on how to create professional email signature explains component selection and formatting standards for professional presentation.
Why Outlook Email Signature Matters
Microsoft’s email platform dominates the corporate landscape. Organizations worldwide rely on this solution for business communication, making it the de facto standard in B2B correspondence. When emailing clients, partners, or prospects, recipients expect professional communication norms—and proper email footers fall squarely within those expectations.
A well-configured email footer serves practical purposes beyond mere aesthetics. Recipients gain immediate access to multiple contact channels: direct phone lines, email addresses, company websites. No excavating through message threads or hunting LinkedIn profiles when someone needs to reach you urgently.
The platform offers one significant advantage: once configured properly, your footer appears automatically across all outbound correspondence. However, unlike consumer email platforms, desktop and web versions don’t synchronize footer settings automatically—each requires separate configuration.
Outlook Signature Setup (Desktop Version)
Already have your email footer prepared? Professional generators output compatible code within five minutes—then simply execute these installation steps for the desktop application.
The desktop client serves as the primary configuration environment for most corporate users. Complete setup here for the application you use most frequently.
Step 1: Access Signature Settings
Launch the desktop application. In the top menu ribbon, locate and select “File” to reveal the backstage view. From the left sidebar menu, choose “Options” near the bottom. This opens the Options dialog window.
Within this dialog, select “Mail” from the left sidebar categories. Scroll down through the mail settings until you encounter the “Compose messages” section. Within this section, you’ll find a button labeled “Signatures…” Select this button to open the configuration panel.
Step 2: Create New Signature
The configuration panel displays any existing footers in the upper section. To generate a new one, select the “New” button positioned below the list. A dialog appears requesting a name for your footer.
Choose a descriptive identifier that clarifies its intended purpose—practical examples include “Corporate,” “Professional,” “Client-Facing,” or simply your name if maintaining only one version. Confirm by selecting “OK.”
Step 3: Add Content to Your Footer
The editor panel becomes available in the middle section of the window. This is where actual footer content resides. Two implementation approaches exist:
Method A: Direct typing approach
Utilize the formatting toolbar positioned above the text area. This toolbar enables basic text formatting, bold or italic styling, font selection, and color application. Type your content directly: name, professional title, company affiliation, phone number, email address, website.
Method B: HTML paste approach
For content generated using a create signature outlook tool or professional generator, paste the HTML code directly into the editor. The application recognizes HTML formatting and renders it appropriately. To paste without introducing formatting conflicts, use Ctrl+Shift+V (paste without formatting).
Maintain minimal complexity—while the desktop version supports more advanced formatting than web variants, simpler footers display more reliably across different email clients.
Step 4: Configure Default Settings
Below the editor, locate the “Choose default signature” section. This area governs automatic footer insertion behavior.
New messages dropdown: Select which footer should appear automatically when composing fresh emails. If you prefer manual control, select “(none).”
Replies/forwards dropdown: Determine whether footers should appear in replies and forwarded messages. Many professionals select “(none)” here to maintain cleaner conversation threads, while others prioritize consistency across all message types.
Email account dropdown: If multiple email accounts are configured, you can assign different default footers to each account.
Step 5: Save and Test
Select “OK” to preserve your configuration and close the panel. Then select “OK” again to close the Options dialog.
Compose a new email message to verify your footer displays correctly. Send a test message to a personal email account and examine its appearance in different email clients. This verification phase catches formatting complications before messages reach actual business contacts.
Outlook 365 Signature Setup (Web Version)
The web-based interface (accessible through outlook.office.com or outlook.live.com) requires completely separate configuration. Settings configured in the desktop application don’t automatically transfer to the web interface.
Already have your email footer ready? Professional generators create code compatible with both desktop and web versions—then follow these steps for web implementation.
Step 1: Access Web Settings
Open the platform in a web browser and sign into your account. In the interface’s top-right corner, locate the gear/cog icon representing settings. Select this icon to reveal the settings panel.
At the top of this panel, locate and select “View all Outlook settings” to access the comprehensive configuration interface.
Step 2: Navigate to Compose and Reply
The settings interface opens with multiple categories in the left sidebar. Select “Mail” to expand mail-related options, then choose “Compose and reply” from the expanded menu.
Step 3: Create Email Signature
Scroll down through the Compose and reply settings until you reach the “Email signature” section. Here you’ll find a text editor for your footer content.
Important distinction: The web editor operates differently from the desktop client. It provides a rich text editor with formatting toolbar but handles HTML differently than the desktop version.
Input your footer content directly or paste HTML code. The editor toolbar offers formatting options for basic styling. For outlook 365 signature setup, keep formatting straightforward—complex HTML sometimes renders inconsistently.
Step 4: Configure Automatic Inclusion
Below the editor, you’ll find a checkbox: “Automatically include my signature on new messages I compose.”
Check this box if you want automatic footer insertion for new messages. Uncheck if you prefer manual control over when footers appear.
Note: Unlike the desktop client, the web version doesn’t offer separate controls for replies/forwards—footers only appear on new messages when the checkbox is enabled.
Step 5: Save Settings
Scroll to the bottom of the settings page and select “Save” to preserve your configuration. The settings panel closes, returning you to the main interface.
Compose a test email to verify your footer appears as intended. Remember that web-configured footers only affect emails sent through the web interface—they don’t appear in the desktop application unless configured separately there.
How to Change Your Email Footer
When professional circumstances evolve—new title, updated contact information, company transition—updating your email footer becomes necessary. Rather than editing existing content (which occasionally introduces formatting complications), the cleanest approach involves creating a fresh version.
To update your Microsoft outlook signature content: execute the steps outlined above for your platform version (desktop or web) to generate a new footer containing current information. Assign it a new name or reuse the previous name. Then in the default settings section, designate your new version as the default option. Finally, remove the outdated footer by selecting it and clicking the “Delete” button.
This approach ensures formatting remains clean and your footer functions reliably across all recipient email clients.
Multiple Email Footers
The platform accommodates multiple footer versions for different communication scenarios. Professional correspondence might require complete contact details, while internal messages could use simplified footers. Sales outreach might incorporate booking links absent from other versions.
Creating Additional Versions
In the desktop client: Open the configuration panel (File → Options → Mail → Signatures), select “New,” name your additional footer, and configure its content.
In the web interface: Currently, the web version supports only one footer per account. For multiple versions, use the desktop application or manually switch content when needed.
Switching Between Versions
The desktop application offers flexible switching: when composing any message, select the “Signature” button in the message ribbon, then choose which footer to insert from the dropdown menu. This enables message-by-message control beyond the configured defaults.
Different Footers for Different Accounts
If multiple email accounts are configured in the desktop version, assign different default footers to each account through the “Choose default signature” section. Select the email account from the dropdown, then assign its specific default footer for new messages and replies.
Common Issues and Solutions
Despite careful configuration, outlook signature settings complications occasionally surface. Here are frequent problems with their resolutions.
Issue 1: Footer Doesn’t Appear in Sent Messages
Root cause: Default settings aren’t configured, or “(none)” is selected in the default dropdown menus.
Resolution approach: Return to configuration settings (desktop: File → Options → Mail → Signatures; web: Settings → Compose and reply). Verify your footer is selected in the default settings section. For the desktop version, check both the “New messages” and “Replies/forwards” dropdowns. Save configuration and test with a fresh email.
Issue 2: Formatting Breaks When Pasting HTML
Root cause: The editor introduces additional formatting during paste operations, or the HTML contains elements the platform doesn’t fully support.
Resolution approach: Deploy Ctrl+Shift+V for paste-without-formatting operations. This strips conflicting formatting codes. If complications persist, the HTML likely contains advanced elements—email footers should employ simple HTML with inline CSS exclusively. Consider using a generator designed specifically for compatibility.
Issue 3: Images Don’t Display for Recipients
Root cause: While the desktop client can embed images, many recipient email clients block external images by default for security reasons.
Resolution approach: Eliminate images entirely from footers. External images create deliverability complications and increase spam filter risk. Text-based footers display universally and reliably. If branding is absolutely required, employ text formatting (colored text, specific fonts) rather than image elements.
Issue 4: Footer Looks Different in Other Email Clients
Root cause: Different email clients interpret HTML formatting inconsistently. What appears perfect in one platform might break in Gmail, Apple Mail, or other applications.
Resolution approach: Keep formatting extremely simple. Avoid tables, complex layouts, custom fonts, and advanced CSS. Test your footer by sending to multiple email clients (Gmail, Apple Mail, Yahoo) before deploying for business correspondence. Simplicity ensures broadest compatibility.
Issue 5: Can’t Edit Footer (Grayed Out)
Root cause: Your organization’s IT administrator has disabled footer editing through Group Policy settings, or you’re attempting to modify content assigned by your organization.
Resolution approach: Contact your IT administrator. Some organizations enforce standardized footers across all employees for branding consistency and legal compliance. You may have limited or no ability to modify centrally-managed content.
Issue 6: Footer Duplicates in Reply Threads
Root cause: Your footer is configured to appear in both new messages and replies, and you’re also quoting the previous message which includes the sender’s footer.
Resolution approach: In the desktop application’s default settings, select “(none)” for the “Replies/forwards” dropdown. This prevents your footer from appearing in replies, keeping conversation threads cleaner. Your footer still appears on new messages where it matters most.
Best Practices for Email Footers
Embrace simplicity. The platform supports more formatting options than many email applications, but recipient email clients vary widely. Simple, text-based footers display reliably everywhere; complex designs frequently break. Adhere to one font, minimal styling, zero external images.
Test across platform versions. If you use both desktop and web interfaces, configure and test footers in both environments. Send test messages from each version to verify consistent appearance. Remember they require separate configuration—settings don’t synchronize automatically.
Maintain version consistency. While desktop and web require separate setup, ensure the content remains identical across both. Inconsistent footers confuse recipients and appear unprofessional. Update both whenever information changes.
Update systematically. Establish quarterly calendar reminders to audit contact information across all platform versions you use. Professional titles evolve, phone numbers change, companies rebrand. Your footer should reflect current reality across every interface.
Eliminate external images. The desktop client tempts users with image embedding capabilities, but external images create complications: recipient email clients block them, they increase message size, they elevate spam filter risk. Text-based footers function universally and reliably.
Build context-appropriate versions. Leverage the desktop application’s multiple footer capability. Generate separate versions for client correspondence (complete details), internal messages (simplified), sales outreach (booking links), and executive communication (minimal). Switch based on recipient context.
Prioritize mobile experience. Over 60% of business emails receive initial opens on mobile devices. Your footer must function on smartphone screens. Maintain reasonable line lengths, ensure fonts remain legible without zooming, make phone numbers tappable through proper formatting.
Verify cross-client compatibility. Your recipients don’t all use the same email platform. Send test messages to Gmail, Apple Mail, and Yahoo accounts. Verify your footer displays acceptably across platforms before deploying for actual business correspondence.
Why Use a Generator
The native editor handles basic text formatting adequately, but creating properly structured HTML footers manually demands significant time and technical proficiency. Generators resolve this through streamlined outlook signature setup processes.
They output clean HTML that functions reliably across platform versions and recipient email clients, eliminating experimental iterations. Benefits include:
- Proper formatting that survives transmission and displays correctly for recipients
- Code structure compatible with both desktop and web interface limitations
- Mobile-responsive layouts that adapt to different screen dimensions
- Professional organization achievable within five minutes
- Elimination of common formatting errors that cause display problems
The workflow: input your information, select a template, copy the generated HTML, paste it into the platform (desktop or web following steps above). Total time investment: five minutes versus the 30+ minutes typically required for manual HTML creation and debugging.
Zero HTML knowledge required. No troubleshooting sessions wondering why formatting appears perfect in one version but breaks when recipients open messages in Gmail. Simply professional results that function universally.
Frequently Asked Questions
Can I use different footers for different email accounts?
Yes, but only in the desktop application. Access File → Options → Mail → Signatures, then use the “Choose default signature” section’s email account dropdown. Select each account individually and assign its specific default footer. The web interface currently supports one footer per account without account-specific assignment capabilities.
Why isn’t my footer showing up?
Three common causes warrant investigation: First, verify default settings are configured properly—“(none)” selected in defaults prevents automatic appearance. Second, if using both desktop and web versions, remember they require separate configuration; settings don’t synchronize. Third, check whether your organization’s IT department has disabled footer customization through Group Policy restrictions.
Can I sync my footer between desktop and web versions?
No, Microsoft doesn’t provide automatic synchronization between desktop and web interface footers. Each requires manual configuration. When updating information, remember to update both versions separately to maintain consistency. This limitation frequently frustrates users transitioning between platforms.
How do I add a footer to the mobile app?
Mobile apps (iOS and Android) have limited footer customization. Access app Settings → tap your account → scroll to Signature. The mobile app provides a basic text editor supporting minimal formatting. For most users, the practical approach: configure footers in desktop or web version, which then appear in mobile-sent messages if accounts are properly synchronized.
Can I schedule footer changes?
The platform doesn’t incorporate built-in scheduling functionality for footers. However, you can create multiple versions (examples: “Office Hours,” “Out of Office,” “Holiday Hours”) and manually switch defaults when circumstances change. In the desktop version, switching requires approximately 30 seconds: File → Options → Mail → Signatures → select different default → OK.
What’s the character limit for footers?
The desktop application doesn’t impose a strict character limit, but practical considerations suggest keeping footers under 500 characters. Excessively lengthy footers frustrate recipients, increase message size, and may trigger formatting issues. The web interface has a 4,000-character limit, though typical professional footers consume 200-400 characters.
Why does my footer look different when recipients view it?
Email clients interpret HTML formatting inconsistently. Your footer might appear perfect in one platform but break in Gmail, Apple Mail, or other applications. Recipients use diverse email clients with varying HTML support levels. Resolution: Keep formatting extremely simple, test across multiple platforms before deployment, and prioritize text-based content over complex layouts.
Quick Summary
How to add signature in outlook condenses to:
Desktop Application:
- File → Options → Mail → Signatures button
- New → name your footer → add content
- Configure defaults for new messages and replies
- OK to save → test with real email
Web Interface:
- Settings gear → View all settings
- Mail → Compose and reply → Email signature section
- Add content → enable automatic inclusion checkbox
- Save → test with real email
Desktop and web versions require separate configuration. Settings don’t synchronize automatically between platforms.
Maintain footers simple—text exclusively, six essential information pieces, minimal formatting. Update when information changes across all versions you use. Test before sending to important business contacts.